Tuesday 22 December 2015

Multiple exposure - Abstract - for Alex

A life at sea

Shipwreck and rescue. This abstract image celebrates the life of Alexander Scott Masson who spent most of his adult life at sea.

Wednesday 9 December 2015

Multiple exposure - Falls of Feugh

Spent an hour on the footbridge over the Falls of Feugh taking a large number of multiple exposure images. This image is from three images originally blended in camera, with some minor re-working in Photoshop (white balance, crop and sharpen).

 Blue Feugh

Monday 7 December 2015

Multiple exposure

 Multiple exposure images of the past season's barley fields in Aberdeenshire.

Muir of Fowlis


Near Tough

Images are created in-camera with post-processing limited to crop, mono conversion and adjustments to exposure, contrast and clarity.

Friday 27 November 2015

Intentional Camera Movement


The genre of Intentional Camera Movement (ICM) is not to everyone's taste, but the ICM images of Chris Friel and Valda Bailey are some of the most exciting photographic images that I have seen.

Over the last couple of years I have spent a few days exploring some of the possibilities of ICM. Despite the perception by some that ICM is "just waving the camera around" it really isn't that easy.

Classic starting points for ICM include groups of trees (slow vertical pans) and beaches (slow horizontal pans). It is relatively easy to get some pleasing images with these well-worn subjects, but my efforts with fully hand-held ICM (no tripod) have achieved a poor success rate. I have fired the shutter several hundred times in front of birch trees and now have three of four images that might be considered OK.

The nature of ICM means you do not have full control over the end image. There is inevitably a large element of chance in the end result. Control over the images is achieved mainly through the choice of appropriate shutter speeds, and appropriate camera movements while the shutter is open. Depending on the circumstances, shutter speeds between say 0.5s and 10 seconds might give optimum results. Post processing is also important, but this does not have to be complicated. Post processing can often be limited to careful cropping, and adjustments to white balance, contrast and clarity.

A few months ago I took some ICM images at Aberdeen railway station. I revisited the railway station a few days ago. Here are some of the results.


Thursday 13 August 2015

Lightbox images

Lightboxes are used to provide strong backlights. I've been experimenting with one such device to illuminate flowers and include the translucency of petals and leaves in images.
Poppy

This poppy came from my garden. I had been unsuccessful in trying to capture an image of a poppy with backlight and showing light through the petals. I brought the flower into the house where I could use a lightbox as a source of backlight. The lightbox was placed on the floor and the poppy was placed on the lightbox. The camera was tripod mounted with a cable release attached. Aperture was set to f/18 to ensure sharp image. A few trial shots showed that a short exposure in the order of 1/15s resulted in an image that was close to a silhouette of the flower with little colour visible, and a long exposure of 15s was sufficient to produce an image that was almost entirely burnt out.

Based on this, I decided that seven shots taken at 1-stop intervals would adequately cover the range of useful exposures - that fastest at 1/8s and longest at 8s. These seven shots were followed by one further shot with the lightbox switched off and using natural light through a window to obtain a normally exposed image.

The images were opened in Photoshop and stacked as layers (The relevant commands to do this are: File > Scripts > Load Files into Stack... Add Open Files, and tick the checkbox Attempt to Automatically Alight Source Images.) The darkest image, 1/8s exposure, was placed as the bottom layer and the extra shot with the lightbox switched off was placed at the top. It's handy to know the command to reverse the order of layers here: Layer > Arrange > Reverse.

Starting with the bottom darkest layer, each subsequent layer is processed in turn: a black layer mask is added to the next layer and a white brush is used manually to selectively paint in parts of the layer.

Orange poppy


Deconstructed orange poppy


Monday 13 July 2015

Quiraing

I recently spent two days on the Isle of Skye where I had hoped to get some amazing images of the Quiraing. I set out to walk up the Quiraing but the weather seriously deteriorated so I turned back when I was only half way up. It's not obvious from this image but the rain was heavy.

The Quiraing 
A test shot showed that the light conditions were difficult with a very wide range of light intensities from bright patches in the sky to very dark shadows in the cliffs. In these circumstances one potential solution is to use an HDR (high dynamic range) process to merge multiple images where two of the shots are exposed correctly for the brightest parts and darkest parts of the scene, and other shots are correctly exposed for intermediate light intensities.

Successful HDR usually requires a tripod to ensure that the series of shots are well aligned with each other, but here I did not have a tripod. The solution was to brace against a convenient rock. Each of these images has been made using five shots in aperture priority mode with shutter speeds ranging from 1/320s to 1/20s, all at aperture f/8 and ISO 400.

With these settings I knew that the images would individually be sharp enough. My main worry was with camera movement between shots and whether the five images could be properly aligned. In the end I needn't have worried because the HDR software (Nik HDR Pro 2) does a good job aligning images taken under these conditions.
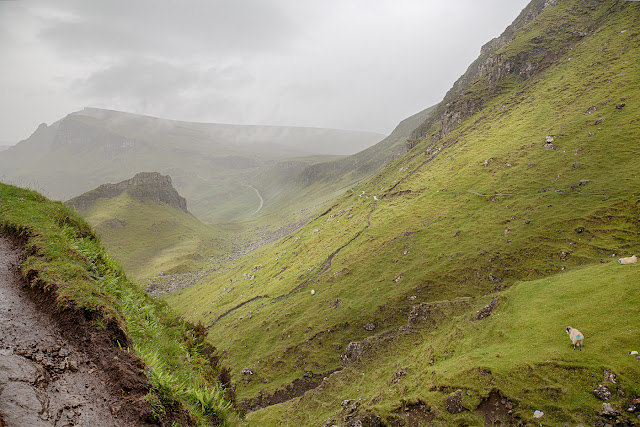
Return from Quiraing
I do not like the unnatural look that I normally associate with HDR images; In order to obtain a relatively natural look I used the default settings throughout, but then did some further processing using Photoshop layers because output from HDR was rather flat.
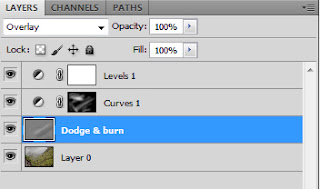
Photoshop layers
The various Photoshop layers are shown here. The bottom layer "Layer 0" is the output from the HDR process. I then added a dodge and burn layer. This is a blank layer filled with 50% gray with the blend mode set to "Overlay". A dodge and burn layer allows you to selectively lighten and darken parts of the image. Just use a soft brush  with low opacity and flow (both set to about 20% here) and paint black or white onto the layer. I then added a curves layer and mask, "Curves 1", to selectively add local contrast. Finally I added a levels layer to adjust the white point ensuring that the entire image was not too dark.

Thursday 2 July 2015

Thinking about colours

I am taking a digital photography training course run by the Open University in collaboration with the Royal Photographic Society. The course is a mixture of practical photography assignments, learning through online course work, plus opportunity for sharing and reflection. I'm getting a lot out of the course through the course material and reading around the fringes.

As an example, a recent assignments has encouraged deeper thinking about the use of colour in images and how it affects balance, unity, dynamism and focus of attention.  My first image for this assignment was of a bunch of Tesco's finest flowers, Alstroemeria.

Alstroemeria

The subject flowers are naturally vibrant with hues that are close to each other on the colour wheel. The green leaves provide a strong colour contrast to the flowers and boost the perceived vibrancy of the flowers. The subject was backlit with daylight to give a natural glow to the flowers and the leaves.

I wanted to ensure that the nearest flowers were in very sharp focus with the further flowers being in softer focus. In order to get the necessary depth of field I used focus stacking. Focus stacking involves taking a series of images at different focal distances. For this image, I took three shots - the first with the nearest flower in sharp focus. The second shot was focused about 5cm behind the first, with the third focused about 5cm further back again. Successful focus stacking requires a solid stable tripod and software that can merge the various images. I used Zerene Stacker to merge the images.

The second image for the assignment shows an old cracked bowl that contains shells that have been collected over a period of many years.

Shells

The colours in this image are intentionally very subdued. The background colour is similar to the hues found in the bowl and shells. The natural lighting gave a rather flat image so post-processing has included some dodge and burn to bring out the contours of the shells. The orange shell was originally a much more intense orange colour. It has been desaturated in post-processing so that it did not overwhelm the image.

Tuesday 26 May 2015

Infrared image

Here is my first effort at an "infrared (IR)" image - taken earlier today.  

Infrared image 

This is made with a Hoya R72 infrared filter (received in this morning's post) fitted to my Canon 5D mk3. The key steps in the process for producing this image were as follows:

  1. Screw on the filter.
  2. Set the white balance. None of the "standard" white balance settings are suitable because the camera is looking at the infrared component of light. The custom white balance is set by reference to brightly lit green grass. Green grass mainly reflects green, plus smaller amounts of other colours including infra-red, so when the filter is attached the camera sensor sees only the IR light from the sun that is reflected off the green grass. The sensor does not see green.
  3. Take the shot. This is easier said than done because the filter takes out essentially all visible light; nothing is visible through either the viewfinder or the LCD screen. The easiest way to focus is to unscrew the filter, set the focus, switch to manual focus and then re-attached the filter, taking care not to move the focus setting. After some trial and error with exposures, the shot was taken at ISO3200, f/8 with a  15s exposure. The exposure time would have been even longer if I had used a lower ISO value. All IR photographs obtained using the method  described here require a long exposure time - you can see that some leaves are blurred as a result of the breeze and long exposure time. (In practice I am sufficiently familiar with the focus settings on the lens that I could set the focus near enough without use of viewfinder or LCD, and without unscrewing the filter. For some shots it may be important to note that IR focuses at a slightly different  point than visible light. Here the f/8 setting gave sufficient depth of focus that the different focal point for IR did not matter.)
  4. Process the raw image in Photoshop. All the visible colours in the image are "false" because the IR itself is not visible. Processing decisions are therefore based on aesthetics and what other people have discovered to produce a pleasing image. My main processing steps were as follows: 
  • Add a Channel mixer layer: Image > Adjustments > Channel mixer. For the red channel, set red to 0% and blue to 100%. For the blue channel set blue to 0% and red to 100%. This effectively swaps the red and blue channels.
  • Add a Levels layer: Image > Adjustments > Levels. Adjust the sliders for black point, white point and grey point to obtain a pleasing range of tones. I was originally advised to automate this by clicking the Auto RGB button, but a bit of trial and error showed that manual adjustment is preferable.
  • Add Hue / saturation layer: Image > Adjustments > Hue/saturation. Use the targeted adjustment control to bring the saturation of the foliage colours into an acceptable range. Similarly, make adjustments to the saturation of the sky. 

That completed 95% of the processing but here I also made some small local contrast adjustments in the long grass-like foliage at bottom-left of image, and in the tree at right.


If it's not clear from what has been said, The real colours were the colours of spring in Scotland - green grass and leaves, and a pale blue sky with white fluffy clouds. The sky was not that colour and none of the foliage was pink. All the colours in an IR image are false colours.

[Edit Feb 2019: Since taking this shot I have been asked why I altered the blue channel. Great question! Each pixel in the camera sensor has elements that are sensitive to red, green and blue (RGB) light. These elements are also sensitive to other colours including infra-red. Surprisingly, the blue sensor elements have a relatively high sensitivity to infra-red so the blue channel makes important contributions to the overall image.]


    Monday 11 May 2015

    Cushnie hail

    The image of hail in an earlier blog prompted me to look again at an image of hail from a few years ago. 
    I was driving through Cushnie in Aberdeenshire in April 2012 when I spotted a hail storm. I pulled in to the side of the road and managed to get about six shots on my Canon 500D (Rebel T1i) before the hail storm fizzled out. (Hail storms really do fizzle.)  

    Original conversion using Adobe Camera Raw. 

    I reworked the original capture using Nik Silver Efex - cropping off part of the foreground, boosting contrast and working to bring out more detail and drama in the hail. I reckon it's an improvement. It's certainly different.

    New conversion using Nik Silver Efex

    Monday 4 May 2015

    Jazz festival

    Konrad Wiszniewski (tenor saxophone) & Euan Stevenson (piano) played at Banchory's jazz festival on Friday. Last night we had Courtney Pine (bass clarinet) & Zoe Rahman (piano).  All excellent!

    I took a few pictures from a seat in the 7th row using my Sony RX100. The venue was so dimly lit I doubted there would be any usable images. I was forced to go to an uncomfortably high ISO.

    Zoe Rahman and Courtney Pine (1/50 f/4.9 ISO 3200, no flash)

    I am using the original RX100. I am told that the Mark 3 is considerably better, but my model is good enough for now. It's a nice pocket-camera.


    Sunday 3 May 2015

    Bad weather

    The weather is so bad that I stayed indoors all day. The house is about 280m above sea level, so we sit in the clouds some days. Today we have cloud, wind and heavy rain. Here is today's view through the window.


    But when the weather is kind we can get great views even when the rest of Aberdeenshire has bad weather. Here is an image from Tuesday when large parts of Aberdeenshire were getting hail.


    Hail storms can give interesting images. Bad weather isn't necessarily bad for photography.